How to Find, Collect, and Photograph Ladybugs
Where and when to look for ladybugs: The best time will be early summer and when it isn't too dry. Peak season will vary according to your local climate. The best places to look will be in lush plant growth (especially if there are aphids). Agricultural fields can make excellent collecting sites. Crops that are known to harbor ladybugs include forage fields like alfalfa, clover, and grains like wheat and corn (before it gets too tall). Always get permission from the grower and make sure that the field has not been recently sprayed with chemicals. Check http://www.localharvest.org/ for an organic farm nearby. Wild flowers, weeds and even trees and shrubs can also be home to many ladybugs!
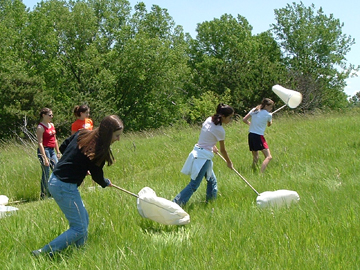
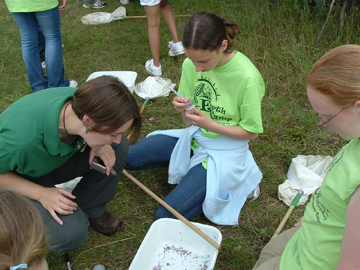 How to Photograph Ladybugs We need an image of your ladybug for our files. You can always photograph the ladybugs on the plants where you find them. They won't wiggle as much if left undisturbed. But when working in groups collecting can be fun and be a great way to get a good look at your specimens!
How to collect ladybugs: The best collection method will depend on the habitat. For softer plants like grasses, weeds or flowers you will catch more if you use a sweep net. A sweep net is essentially a tough cloth bag on a metal ring attached to long handle. By sweeping your net back and forth through the plants you knock the ladybugs (and other insects and spiders) off and they land in your net. You can either build your own net (see our directions for building an inexpensive, functional net or tips from the American Museum of Natural History - be sure to use strong wire and fabric) or you can buy sweep nets Bioquip). If you do use a sweep net you will probably want to divide into two groups with one group “sweeping” and then dumping what they find into a bin or onto a sheet for the other group to catch and place in containers. For tough, thorny, or woody plants you can carefully grab the ladybugs or tap them into a jar. Alternatively you can lay a sheet below the bush or tree and “beat it” (not too hard!) with a stick or dowel and then collect the ladybugs as they fall onto the sheet.
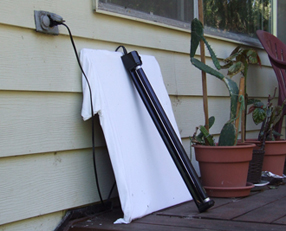 Ladybugs may also be attracted to porch lights and/or blacklights. A spotter from Oregon shared this image of a blacklight (purchased for under $10 at a large department store) set up with a board covered by a large white t-shirt. Any white cloth - the brighter the better - over any flat surface, cardboard or lawn chair, can work. It's good to set the blacklight up near another type of light, such as a porch or flourescent light that will also attract insects, and allow some space behind the blacklight for insects that prefer the shadows.
Chill out!! The problem with collected (disturbed) ladybugs is that they will probably be too active to get a good image unless you slow them down a little. You can do this in a freezer at home or in a cooler in the field. Ladybugs can be chilled in a freezer safely for 5 minutes (over six may kill them) and this will quiet them for 2-4 minutes. Coolers are not as cold as freezers so it will take 30+ minutes to get 1-6 minutes of quiet time. They will survive for days in a refrigerator or chilled cooler.
Place your chilled out ladybug on a light gray (or white) background and take the largest shot you can while maintaining focus. (Click here to download a page of an ideal gray background color.) If your camera has a close-up setting indicated by a tulip symbol ![]() , that will help! Glare or reflection off the shiny beetle elytra is often more of a problem than not having enough light. Shield the beetle from bright lights and use the flash only if absolutely necessary. Adding a size reference, like a coin or ruler, to the photograph is also often helpful. For some species, details of the pronotum may be very important for species identification. So please do not hesitate to submit a second photograph if the first is not clear enough.
, that will help! Glare or reflection off the shiny beetle elytra is often more of a problem than not having enough light. Shield the beetle from bright lights and use the flash only if absolutely necessary. Adding a size reference, like a coin or ruler, to the photograph is also often helpful. For some species, details of the pronotum may be very important for species identification. So please do not hesitate to submit a second photograph if the first is not clear enough.
Remember that this is not a ladybug photo contest!
The more the photos the better! - even if they are all the same kind of ladybug.
Zeros are useful data! Tell us even if you searched and didn’t find any ladybugs.
Data is most useful if you can tell us - where and how you collected, how many people collected for how long, the time, date, weather, and habitat.
As long as an image is good enough for us to identify the ladybug species it will be an important part of our data base. Don’t be discouraged if the largest image you can get in focus seems too small to identify. With most cameras, a photo size of 200 - 400 kb means that even a distant, but well focused ladybug can be enlarged enough to make an identification.
Each photo must be less than 2Mb in size. Page 2 of the submission form allows for up to 2 photos of each of up to 5 ladybugs. But there is also a 7 Mb limit per page (of up to 10 photos). You will be able to upload up to 10 photos (or 7 Mb) as many times as you need to complete your records.
Group photos are fine. But please do not put more than 10 ladybugs in one picture, unless you are photographing an aggregation.
Here are some examples of pictures that we were able to identify easily:

How to Send Your Images. The easiest way to send us an image is to use the Upload Photos Form on this website or use the LLP App. You will be asked where and how you collected, how many people collected for how long, the time, date, weather, and habitat. For troubleshooting or other communications please write to ladybug@cornell.edu. If you don’t have a digital camera you can send a print to: Lost Ladybug Project, Department of Entomology, Insectary Building, Cornell University, Ithaca, NY 14853.
We hope to harm very few ladybugs during this project so in most cases we will ask you to release the ladybugs. If you have found a very rare species we may ask you to send the ladybug to us.
